We are going to extend the code based on the solution from the the previous article. You can follow along by downloading the whole project from my GitHub repository. This solution in based on ASP.NET Core 8.
Assumptions
We will operate under the following assumptions:
- Entity Framework Core will be utilized to connect to an in-memory database.
- Each tenant will have its own isolated in-memory database instance, ensuring data segregation and independence.
Preparing the first entity and database context
We begin by creating an entity named AppUser. For simplicity, this entity will have only two properties: Id and Name, omitting any password or authentication-related fields.
public class AppUser{ public int Id { get; init; } public string Name { get; init; }}Next, we define a TenantDbContext, which will serve as the database context for accessing the current tenant's database. This context includes a DbSet<AppUser> to manage AppUser entities within the current tenant's data scope.
public class TenantDbContext(DbContextOptions options) : DbContext(options){ public DbSet<AppUser> AppUsers { get; init; }}Seeding data on application startup
First of all, we need the Microsoft.EntityFrameworkCore.InMemory package in our project. Let's start from installing it with this command:
dotnet add Microsoft.EntityFrameworkCore.InMemoryNow, we create a DatabaseSeeder, a static class that will be invoked during the application startup to seed an in-memory database. This seeding process will be performed for both tenant1 and tenant2, with each tenant having two users. It is important to note that the DatabaseSeeder is intended solely for demonstration purposes and should not be used in a production environment!
public static class DatabaseSeeder{ public static void Seed() { SeedInternal("tenant1", new List<AppUser> { new() { Name = "Mike" }, new() { Name = "Bartek" } });
SeedInternal("tenant2", new List<AppUser> { new() { Name = "Per" }, new() { Name = "Thomas" } }); }
private static void SeedInternal(string tenantId, List<AppUser> appUsers) { var options = new DbContextOptionsBuilder().UseInMemoryDatabase(tenantId).Options; using var context = new TenantDbContext(options); context.AppUsers.AddRange(appUsers); context.SaveChanges(); }}After this, we invoke the Seed method immediately after building the application. This action populates the in-memory database with the predefined data, which will be accessible later during the application's execution. This approach ensures that each tenant has its own set of users available from the start.
var builder = WebApplication.CreateBuilder(args);
var services = builder.Services;
services.AddHttpContextAccessor();services.AddControllersWithViews();services.AddMultitenancy();services.AddMultitenantAuthentication();
var app = builder.Build();
// Only for demo purposes!DatabaseSeeder.Seed();
app.UseDeveloperExceptionPage();app.UseStaticFiles();app.UseMiddleware<TenantResolutionMiddleware>();app.UseRouting();app.UseAuthentication();app.UseAuthorization();
app.MapControllerRoute( name: "default", pattern: "{controller=Home}/{action=Index}");
app.Run();Registaring tenant database context
Next we register a database context factory using the AddDbContextFactory method, which is responsible for creating a scoped TenantDbContext object based on the current tenant. It is crucial that the TenantDbContext is scoped to ensure that each request has its own context instance. Under the hood, the framework utilizes the DbContextFactory to instantiate the TenantDbContext based on a tenant available in the TenantContext object. While we are using an in-memory database for demonstration purposes, in a real-world application, this could be a SQL Server or other database, where you would retrieve the tenant's database connection string based on the tenant's name.
// DbContextRegistrationExtensions.cs
public static class ServiceCollectionExtensions{ public static IServiceCollection AddTenantAwareDbContext(this IServiceCollection services) { services.AddDbContextFactory<TenantDbContext>((provider, optionsBuilder) => { var tenantContext = provider.GetRequiredService<TenantContext>(); var tenantName = tenantContext.CurrentTenant.Name;
optionsBuilder.UseInMemoryDatabase(tenantName); // alternatively get tenant database connection string and invoke UseSqlServer() }, ServiceLifetime.Scoped);
return services; }}We then invoke the AddTenantAwareDbContext method in Program.cs during the application startup. From this point forward, the tenant database context is configured, allowing us to inject it into our controllers or other services as needed.
var builder = WebApplication.CreateBuilder(args);
var services = builder.Services;
services.AddHttpContextAccessor();services.AddControllersWithViews();services.AddMultitenancy();services.AddMultitenantAuthentication();services.AddTenantAwareDbContext();
// ...Logging in as a user existing in the tenant database
We will extend the existing AccountController by injecting the TenantDbContext into it. This allows us to utilize the database context within the Login method to retrieve a user based on the username provided in the login form we created in a previous article. By querying the TenantDbContext, we ensure that the login process is tenant-specific, verifying the user's existence within the current tenant's database.
public class AccountController( ITenantContext tenantContext, TenantDbContext dbContext) : Controller{ [HttpGet] public ActionResult Login([FromQuery] string returnUrl) { return View(new LoginViewModel { ReturnUrl = returnUrl }); }
[HttpPost] [AutoValidateAntiforgeryToken] public async Task<ActionResult> Login([FromForm] LoginViewModel viewModel) { var appUser = dbContext.AppUsers .SingleOrDefault(x => x.Name == viewModel.UserName);
if (appUser == null) { throw new UnauthorizedAccessException( $"User '{viewModel.UserName}' does not exist!"); }
var claims = new List<Claim> { new("UserName", appUser.Name) };
var identity = new ClaimsIdentity( claims, CookieAuthenticationDefaults.AuthenticationScheme);
var claimsPrincipal = new ClaimsPrincipal(identity);
await HttpContext.SignInAsync( CookieAuthenticationDefaults.AuthenticationScheme, claimsPrincipal);
return Redirect(viewModel.ReturnUrl ?? $"/{tenantContext.CurrentTenant.Name}"); }
// ...}Reading app users
Let's also enhance the UI by displaying all users associated with the current tenant after logging in! To do this we extend the HomeController by injecting the TenantDbContext object. This allows us to retrieve all users from the current tenant's database and include them in the HomeViewModel.
[Authorize]public class HomeController( ITenantContext tenantContext, TenantDbContext dbContext) : Controller{ [HttpGet] public ActionResult Index() { var loggedUserName = User.Claims.Single(x => x.Type == "UserName").Value; var tenantName = tenantContext.CurrentTenant.Name;
var appUsers = dbContext.AppUsers.ToList();
return View(new HomeViewModel { Message = $"User '{loggedUserName}' is logged on tenant '{tenantName}'", AppUsers = appUsers }); }}
public class HomeViewModel{ public required string Message { get; init; } public required List<AppUser> AppUsers { get; init; }}We then display the list of users in a foreach loop within the view.
@model MultitenantAspNetCoreApp.Controllers.HomeViewModel
<div>@Model.Message</div>
<div> All users available for this tenant: <ul> @foreach (var appUser in Model.AppUsers) { <li>@appUser.Name</li> } </ul></div>
<form asp-controller="Account" asp-action="Logout" method="get"> <button>Logout</button></form>Testing our solution
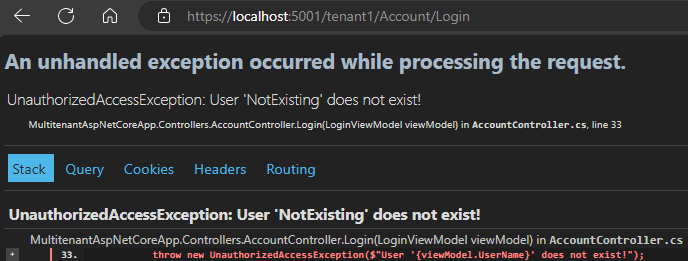
Ok, let’s try this out! First, we try to log in to tenant1 with a non-existing user. Based on our logic in this scenario we should get an exception.


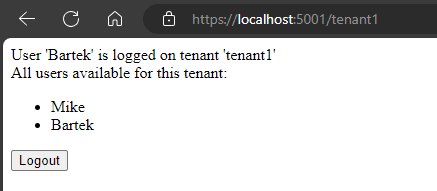
When we try to log in as a user that exists in a given tenant database then everything works fine. Furthermore, now we show all other users for this tenant on a UI.


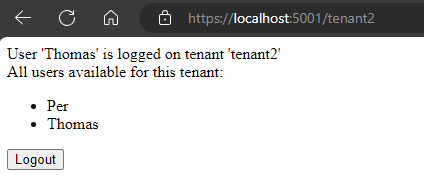
Now, let's try to log in to tenant2 as an existing user. Again, all users are displayed for this tenant but this time from another database.


When we go back to tenant1 in a browser tab we're still logged and different data is displayed.

Conclusion
In this article, we extended our multi-tenant application by implementing a mechanism to log in users based on their existence in a tenant-specific database. We achieved this by injecting the TenantDbContext into our controllers, allowing us to authenticate users and display all users associated with the current tenant. Although we utilized an in-memory database for demonstration purposes, this solution is adaptable to any database type by retrieving the appropriate tenant connection string and configuring the corresponding database connection. This approach ensures that our application remains flexible and scalable, capable of supporting various database technologies while maintaining tenant data isolation.
